Quick Start Guide
Get up and running with TrainLoop Evals in under 5 minutes. This guide walks you through setting up your first evaluation project, collecting LLM data, and running your first evaluations.
What is TrainLoop Evals?
TrainLoop Evals is a complete evaluation framework for LLM applications that consists of three main components:
- SDKs - Zero-touch instrumentation libraries that capture LLM request/response data from your application
- CLI - Command-line tool that analyzes your captured data using metrics and generates evaluation results
- Studio UI - Web interface for visualizing results, comparing models, and exploring your data
How It Works
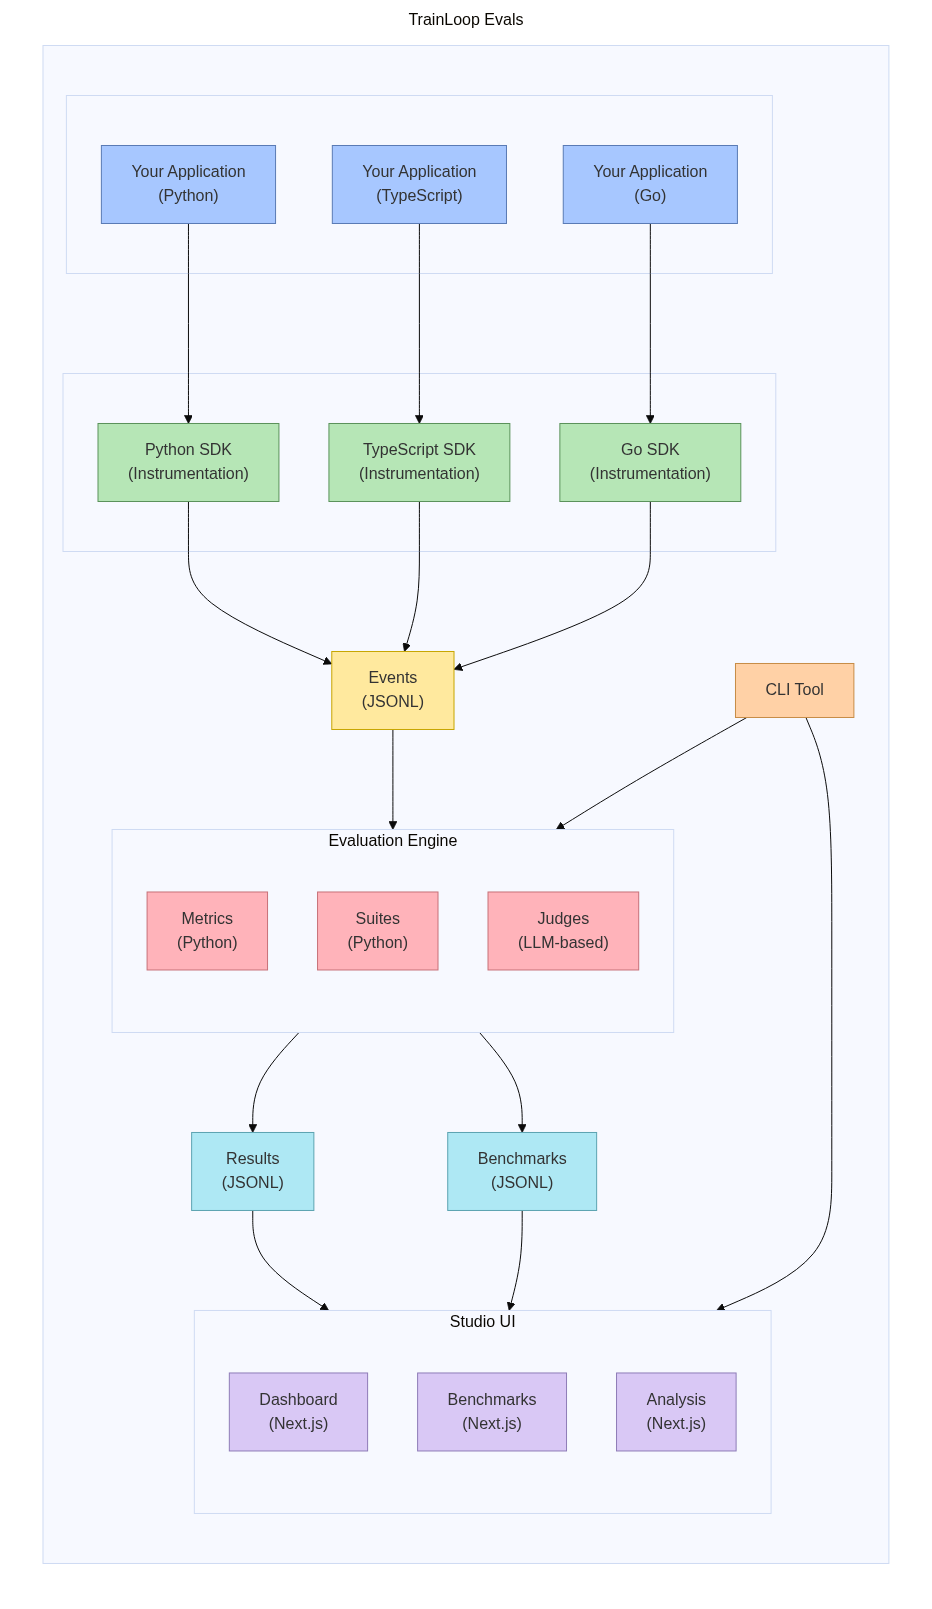
The complete TrainLoop Evals workflow:
- Your Application (Python/TypeScript/Go) makes LLM calls
- TrainLoop SDK automatically captures request/response data
- Events are stored as JSONL files in your data folder
- CLI Tool processes events using your custom metrics and suites
- Evaluation Engine applies metrics and generates results/benchmarks
- Studio UI provides interactive visualization and analysis
Overview
In this quick start, you'll:
- Create a workspace - Set up the TrainLoop directory structure
- Install and configure SDKs - Add automatic data collection to your LLM calls
- Write your first metric - Create a simple evaluation function
- Run evaluations - Execute your first evaluation suite
- Visualize results - View results in the Studio UI
Step 1: Create Your Workspace
First, create a new directory for your project and initialize TrainLoop:
mkdir my-llm-project
cd my-llm-project
trainloop init
This creates the trainloop/ folder structure that organizes your evaluation project:
my-llm-project/
├── trainloop/                  # TrainLoop evaluation workspace
│   ├── data/                   # Data storage (auto-created)
│   │   ├── events/             # Raw LLM interactions (.jsonl files)
│   │   └── results/            # Evaluation results (.json files)
│   ├── eval/                   # Your evaluation code
│   │   ├── metrics/            # Custom metrics (Python functions)
│   │   └── suites/             # Test suites (groups of metrics)
│   └── trainloop.config.yaml   # Configuration file
└── .gitignore                  # Pre-configured for TrainLoop
Why the trainloop/ Folder?
The trainloop/ folder is your evaluation workspace - separate from your application code. This separation allows you to:
- Keep evaluation logic organized - All metrics, suites, and data in one place
- Version control evaluations - Track changes to your evaluation criteria
- Share evaluation setups - Team members can use the same evaluation logic
- Run evaluations anywhere - Works with any application that produces LLM data
Step 2: Prerequisites
Before starting, you'll need:
- API Keys - For the LLM providers you want to evaluate
- Environment Setup - Create a
.envfile in your project root:
# Create .env file with your API keys
cp .env.example .env
- Data Folder Configuration - Tell TrainLoop where to store data:
# Set the data folder environment variable
export TRAINLOOP_DATA_FOLDER="$(pwd)/trainloop/data"

# Or add it to your shell profile for persistence
echo 'export TRAINLOOP_DATA_FOLDER="$(pwd)/trainloop/data"' >> ~/.bashrc
Step 3: Install and Configure SDK
The TrainLoop SDK automatically captures LLM request/response data from your application with zero code changes. Here's how to install it for your language:
Why Install the SDK?
The SDK provides automatic data collection by:
- Intercepting LLM calls - Captures requests and responses transparently
- Writing JSONL files - Saves data to
trainloop/data/events/for analysis - Adding metadata - Includes timestamps, model info, and custom tags
- Zero performance impact - Async logging that doesn't slow your app
Choose Your Language
Choose your application's language and follow the appropriate instructions:
Python Application
First, install the TrainLoop Python SDK:
pip install trainloop-llm-logging
Create a simple Python script that makes LLM calls:
# app.py
import openai
from trainloop_llm_logging import collect, trainloop_tag

# Initialize TrainLoop collection - this patches OpenAI/Anthropic/etc. automatically
collect("trainloop/trainloop.config.yaml")

# Set up OpenAI client (works with existing code!)
client = openai.OpenAI(api_key="your-api-key")

def generate_greeting(name):
    """Generate a personalized greeting"""
    response = client.chat.completions.create(
        model="gpt-4o-mini",
        messages=[
            {"role": "system", "content": "You are a friendly assistant."},
            {"role": "user", "content": f"Generate a warm greeting for {name}"}
        ],
        extra_headers=trainloop_tag("greeting-generation")  # Optional: tag for evaluation
    )
    return response.choices[0].message.content

# Test the function
if __name__ == "__main__":
    greeting = generate_greeting("Alice")
    print(f"Generated greeting: {greeting}")
Run your application:
python app.py
What happens when you run this:
- The SDK automatically captures the OpenAI API call
- Request/response data is written to
trainloop/data/events/YYYY-MM-DD.jsonl - The tag
"greeting-generation"lets you filter this data during evaluation
📚 For complete Python SDK documentation, see Python SDK API Reference
TypeScript/JavaScript Application
First, install the TrainLoop TypeScript SDK:
npm install trainloop-llm-logging
Create a Node.js application:
// app.js
const { OpenAI } = require('openai');
const { trainloopTag } = require('trainloop-llm-logging');

// Set up OpenAI client (works with existing code!)
const client = new OpenAI({
  apiKey: process.env.OPENAI_API_KEY,
});

async function generateGreeting(name) {
  const response = await client.chat.completions.create({
    model: "gpt-4o-mini",
    messages: [
      { role: "system", content: "You are a friendly assistant." },
      { role: "user", content: `Generate a warm greeting for ${name}` }
    ]
  }, {
    headers: { ...trainloopTag("greeting-generation") }  // Optional: tag for evaluation
  });

  return response.choices[0].message.content;
}

// Test the function
generateGreeting("Alice").then(greeting => {
  console.log(`Generated greeting: ${greeting}`);
});
Run your application with automatic TrainLoop instrumentation:
TRAINLOOP_DATA_FOLDER=./trainloop/data NODE_OPTIONS="--require=trainloop-llm-logging" node app.js
What happens when you run this:
- The
--require=trainloop-llm-loggingflag automatically patches HTTP calls - LLM request/response data is written to
trainloop/data/events/YYYY-MM-DD.jsonl - The tag
"greeting-generation"lets you filter this data during evaluation
📚 For complete TypeScript SDK documentation, see TypeScript SDK API Reference
Go Application
First, install the TrainLoop Go SDK:
go get github.com/trainloop/evals/sdk/go/trainloop-llm-logging
Create a Go application:
// main.go
package main

import (
    "context"
    "fmt"
    "log"
    "os"

    "github.com/sashabaranov/go-openai"
    trainloop "github.com/trainloop/evals/sdk/go/trainloop-llm-logging"
)

func main() {
    // Initialize TrainLoop - this wraps HTTP clients automatically
    trainloop.Init()
    defer trainloop.Shutdown()  // Ensure data is flushed

    // Set up OpenAI client (works with existing code!)
    client := openai.NewClient(os.Getenv("OPENAI_API_KEY"))

    // Generate greeting
    greeting := generateGreeting(client, "Alice")
    fmt.Printf("Generated greeting: %s\n", greeting)
}

func generateGreeting(client *openai.Client, name string) string {
    resp, err := client.CreateChatCompletion(
        context.Background(),
        openai.ChatCompletionRequest{
            Model: openai.GPT4OMini,
            Messages: []openai.ChatCompletionMessage{
                {Role: openai.ChatMessageRoleSystem, Content: "You are a friendly assistant."},
                {Role: openai.ChatMessageRoleUser, Content: fmt.Sprintf("Generate a warm greeting for %s", name)},
            },
        },
    )

    if err != nil {
        log.Fatal(err)
    }

    return resp.Choices[0].Message.Content
}
Run your application:
TRAINLOOP_DATA_FOLDER=./trainloop/data go run main.go
What happens when you run this:
trainloop.Init()wraps the HTTP client used by OpenAI- LLM request/response data is written to
trainloop/data/events/YYYY-MM-DD.jsonl trainloop.Shutdown()ensures all data is flushed to disk
📚 For complete Go SDK documentation, see Go SDK API Reference
Step 4: Write Your First Metric
What are Metrics?
Metrics are Python functions that evaluate your LLM outputs. They:
- Take a
Sample(request/response pair) as input - Return
1for pass or0for fail - Define your evaluation criteria (accuracy, tone, format, etc.)
What are Suites?
Suites are groups of metrics that run together. They:
- Organize related metrics
- Filter data by tags (e.g., only evaluate "greeting-generation" calls)
- Generate comprehensive evaluation reports
Let's create metrics to evaluate greeting quality:
# trainloop/eval/metrics/greeting_quality.py
from trainloop_cli.eval_core.types import Sample

def has_greeting_word(sample: Sample) -> int:
    """Check if the response contains common greeting words"""
    response_text = sample.output.get("content", "").lower()
    greeting_words = ["hello", "hi", "greetings", "welcome", "good morning", "good afternoon", "good evening"]

    for word in greeting_words:
        if word in response_text:
            return 1  # Pass
    return 0  # Fail

def is_personalized(sample: Sample) -> int:
    """Check if the response appears to be personalized"""
    response_text = sample.output.get("content", "").lower()

    # Get the user's input to find the name
    user_message = ""
    for msg in sample.input.get("messages", []):
        if msg.get("role") == "user":
            user_message = msg.get("content", "").lower()
            break

    # Simple check: if user message contains a name and response contains it
    if "alice" in user_message and "alice" in response_text:
        return 1  # Pass
    return 0  # Fail

def is_friendly_tone(sample: Sample) -> int:
    """Check if the response has a friendly tone using LLM Judge"""
    from trainloop_cli.eval_core.judge import assert_true

    response_text = sample.output.get("content", "")

    positive_claim = f"The response '{response_text}' has a warm and friendly tone."
    negative_claim = f"The response '{response_text}' is cold or unfriendly."

    return assert_true(positive_claim, negative_claim)
Step 5: Create Your First Test Suite
Create a test suite that uses your metrics:
# trainloop/eval/suites/greeting_evaluation.py
from trainloop_cli.eval_core.helpers import tag
from ..metrics.greeting_quality import has_greeting_word, is_personalized, is_friendly_tone

# Test all greeting generation calls
results = tag("greeting-generation").check(
    has_greeting_word,
    is_personalized,
    is_friendly_tone
)
Step 6: Run Your First Evaluation
What Happens During Evaluation?
When you run trainloop eval, the CLI:
- Reads event data from
trainloop/data/events/*.jsonl - Applies metrics to each LLM request/response pair
- Generates verdicts (pass/fail decisions) for each metric
- Saves results to
trainloop/data/results/*.json
Execute your evaluation suite:
# Run all evaluation suites
trainloop eval

# Or run a specific suite
trainloop eval --suite greeting_evaluation
You should see output like:
🔍 Discovering evaluation suites...
✅ Found 1 suite: greeting_evaluation

📊 Running evaluations...
✅ greeting_evaluation: 3/3 metrics passed

📈 Results saved to trainloop/data/results/
What are Results/Verdicts?
Results are the output of your evaluation containing:
- Verdicts - Individual pass/fail decisions for each metric
- Scores - Aggregated metrics (% pass rate, averages, etc.)
- Metadata - Timestamps, model info, tags, etc.
- Raw data - Original request/response pairs for debugging
Step 7: Visualize Results
What is Studio UI?
Studio UI is a web interface that helps you:
- Explore evaluation results - Interactive charts and tables
- Debug individual calls - See exactly what your LLM said and why it passed/failed
- Track performance over time - Monitor how metrics change across versions
- Compare models - See which LLM performs best for your use case
Launch the Studio UI to explore your results:
trainloop studio
This opens your browser to http://localhost:3000 where you can:
- 📊 View evaluation results in interactive charts and tables
- 📋 Browse individual LLM calls and their evaluation verdicts
- 📈 Track metrics over time across different runs
- 🔍 Filter and search through your data by tags, models, dates
- 🔧 Debug failures by seeing exact input/output pairs
Step 8: Iterate and Improve
Based on your evaluation results, you can:
- Refine your prompts - Improve system messages for better results
- Add more metrics - Create additional evaluation criteria
- Test different models - Compare performance across LLM providers
- Automate evaluations - Run evaluations in CI/CD pipelines
Next Steps
Now that you have a working TrainLoop Evals setup, explore these advanced features:
🔧 Advanced Configuration
Configure TrainLoop behavior in trainloop.config.yaml:
trainloop:
  data_folder: "./data"
  log_level: "info"

  # LLM Judge configuration
  judge:
    models:
      - openai/gpt-4o
      - anthropic/claude-3-sonnet-20240229
    calls_per_model_per_claim: 3
    temperature: 0.7

  # Benchmarking configuration
  benchmark:
    providers:
      - openai/gpt-4o
      - openai/gpt-4o-mini
      - anthropic/claude-3-5-sonnet-20241022
    temperature: 0.7
    max_tokens: 1000
📊 Benchmarking
Benchmarking lets you compare multiple LLM providers on the same tasks to find the best model for your use case.
What Does Benchmarking Give You?
- Model comparison - See which LLM performs best on your specific metrics
- Cost analysis - Compare performance vs. cost for different providers
- Objective evaluation - Data-driven model selection instead of guesswork
- Regression testing - Ensure new models don't hurt your performance
Compare multiple LLM providers:
# Add API keys to .env file
cp trainloop/.env.example trainloop/.env
# Edit trainloop/.env with your API keys

# Run benchmarks
trainloop benchmark
This will:
- Re-run your prompts against different LLM providers
- Apply your metrics to each provider's responses
- Generate comparison results showing which model performs best
- Display results in Studio UI with side-by-side comparisons
🎯 Advanced Metrics
Create more sophisticated evaluation metrics:
# trainloop/eval/metrics/advanced_metrics.py
from trainloop_cli.eval_core.types import Sample
from trainloop_cli.eval_core.judge import assert_true
import json

def response_length_appropriate(sample: Sample) -> int:
    """Check if response length is appropriate for the task"""
    response_text = sample.output.get("content", "")
    word_count = len(response_text.split())

    # Greeting should be between 5-50 words
    return 1 if 5 <= word_count <= 50 else 0

def follows_instructions(sample: Sample) -> int:
    """Check if the response follows the given instructions"""
    response_text = sample.output.get("content", "")

    # Use LLM Judge for complex evaluation
    instruction_claim = f"The response '{response_text}' follows the instruction to generate a warm greeting."
    violation_claim = f"The response '{response_text}' does not follow the instruction to generate a warm greeting."

    return assert_true(instruction_claim, violation_claim)
🔍 Registry System
Add pre-built metrics and suites:
# List available components
trainloop add --list

# Add a metric from the registry
trainloop add metric always_pass

# Add a suite from the registry
trainloop add suite sample
Troubleshooting
Common Issues
No data collected
- Ensure
TRAINLOOP_DATA_FOLDERis set correctly - Check that your LLM calls are being made
- Verify the SDK is properly initialized
Evaluation fails
- Check that your metric functions return integers (0 or 1)
- Ensure the
resultsvariable is defined in your suite files - Verify your tag names match between data collection and evaluation
Studio UI doesn't show data
- Confirm evaluations have been run (
trainloop eval) - Check that result files exist in
trainloop/data/results/ - Try refreshing the browser or restarting the Studio
Getting Help
- Documentation: Browse the guides and reference
- Discord: Join our community for help and discussions
- GitHub Issues: Report bugs or ask questions
- Examples: Check the demo repository
Congratulations! 🎉
You've successfully set up TrainLoop Evals and created your first evaluation workflow. You're now ready to build robust, data-driven evaluations for your LLM applications.
Continue with the guides to learn about advanced features, or explore the reference documentation for detailed API information.